MySQL是一个常用的数据库管理系统,关于数据库可以简单理解多个有关联的二维表组成。

其中SQL(Structured Query Language)指操作关系型数据库的编程语言。

特点(1)关键字不区分大小写;(2)分号; 作为语句结束标志

笔记主要参考资料:【黑马程序员 MySQL数据库入门到精通,从mysql安装到mysql高级、mysql优化全囊括】的基础入门部分 https://www.bilibili.com/video/BV1Kr4y1i7ru?share_source=copy_web&vd_source=6edf13733e01570d1376e8b5e1ccbd6e

MySQL - 维基百科,自由的百科全书

一、安装与用户管理

1、在centos7 linux系统中安装mysql [上述教学视频中为window安装],需要ROOT权限。

https://www.hostinger.in/tutorials/how-to-install-mysql-on-centos-7

在安装过程中遇到的注意事项

  • 如果之前已经安装,需要卸载干净之前的记录,参考https://learnku.com/articles/35042
  • 其中遇到公钥尚未安装的问题解决报错,参考Centos7 yum安装的时候遇到公钥尚未安装的问题解决_张志翔 ̮的博客-CSDN博客解决
  • 初次修改密码需要包含数字、字符、大小写,且长度大于8;可在之后修改密码强度要求等级。https://stackoverflow.com/questions/43094726/your-password-does-not-satisfy-the-current-policy-requirements
1
2
3
4
5
6
7
# 以root身份进入mysql系统,根据提示输入密码
mysql -h localhost -u root -p
quit

-- systemctl status mysqld
-- systemctl start mysqld
-- systemctl stop mysqld

2、创建新用户

 1
 2
 3
 4
 5
 6
 7
 8
 9
10
11
12
## 查看所有用户
select Host, User from mysql.user; 

## 创建用户并设置密码
create user 'test'@'localhost' identified by '123456';
alter user 'test'@'localhost' identified with mysql_native_password by '654321';
drop user 'test'@'localhost';

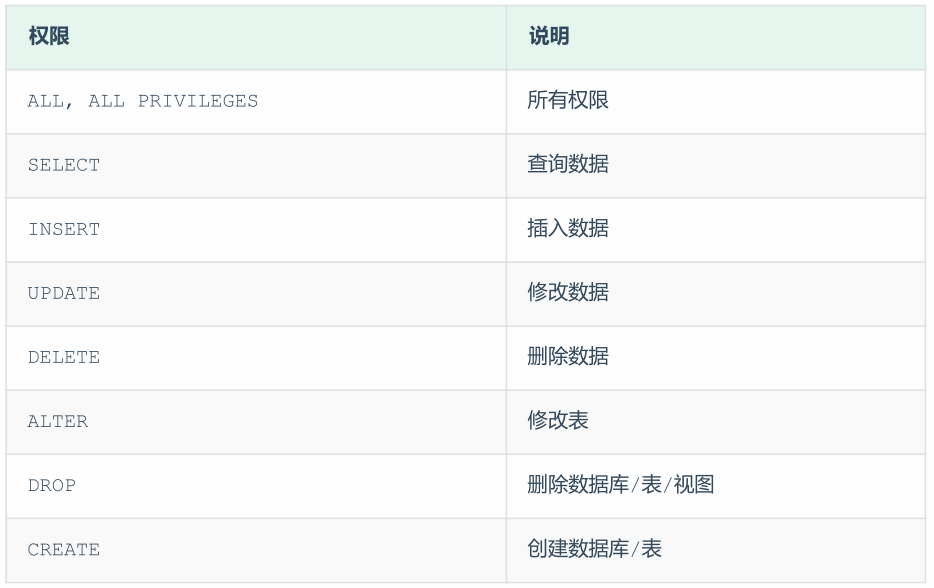
## 用户权限管理
SHOW GRANTS FOR 'test'@'localhost' ; 
grant all on *.* to 'test'@'localhost';     # *.*表示匹配任意数据库的任一表
revoke all on *.* to 'test'@'localhost';     # *.*表示匹配任意数据库的任一表
image-20221022120230351

二、数据查询与操作

1、database基础操作

 1
 2
 3
 4
 5
 6
 7
 8
 9
10
11
12
13
14
15
# (1)查询所有数据库
show databases;

# (2)进入/切换至某一数据库
use sys;

# (3)查看当前所处于的数据库
select database();

# (4)创建数据库
create database firstdb;
create database if not exists firstdb;

# (5)删除数据库
drop database firstdb;

2、table表基础操作

 1
 2
 3
 4
 5
 6
 7
 8
 9
10
11
# (1)查询当前库的所有表
show tables;

# (2)查看指定表的每一列数据概况
desc host_summary;

# (3)修改表名
alter table new_table rename to first_table;

# (4)删除表
drop table first_table;

3、创建表以及列修改

  • 创建一张表的关键是交代每一列(字段)的名字、数据类型等。其中常见的数据类型包括

整型:int

小数:float,float(4, 1)

定长字符串:char, char(3)

变长字符串:varchar, varchar(10)

日期:date – 年月日

null为特使的数据类型,表示空值

 1
 2
 3
 4
 5
 6
 7
 8
 9
10
11
12
13
14
15
16
17
18
19
20
# (1) 如下创建一个名为first_table的表,对应的comment表示列备注、表备注
create table first_table(
	id int comment '编号',
	name varchar(50) comment '姓名',
	age int comment '年龄',
	gender varchar(1) comment '性别'
) comment '用户表';
desc first_table;

# (2) 修改列名及数据类型
alter table first_table change name fakename char(3);

# (3) 仅修改列的数据类型
alter table first_table modify fakename char(5);

# (4) 删除列
alter table first_table drop fakename;

# (5) 增加列
alter table first_table add nickname varchar(10) comment '昵称';

4、行内容(表数据)修改

 1
 2
 3
 4
 5
 6
 7
 8
 9
10
11
12
13
14
15
16
# (1) 增加1/多行数据
insert into first_table(id,name,age,gender) values (1, "张三", 18, "男");
insert into first_table values 
	(2, "李四", 19, "男"),
	(3, "王二", 20, "女");
select * from first_table;

# (2) 修改特定数据
update first_table set age=88 where name="张三";
update first_table set gender="男"; 

# (3) 删除行数据
delete from first_table where age>80;
delete from first_table

# (4) 删除某一个值,可使用update更新为 null

5、创建示例数据

 1
 2
 3
 4
 5
 6
 7
 8
 9
10
11
12
13
14
15
16
17
18
19
20
21
22
23
24
25
26
27
28
29
30
31
32
33
### 员工表
create table emp(
	id int comment '编号',
	workno varchar(10) comment '工号',
	salary int comment '工资',
	name varchar(10) comment '姓名',
	gender char(1) comment '性别',
	age tinyint unsigned comment '年龄',
	idcard char(18) comment '身份证号',
	workaddress varchar(50) comment '工作地址',
	entrydate date comment '入职时间',
	dept_id int comment '部门'
	)comment '员工表';
INSERT INTO emp values
	(1, '00001', 5000, '柳清尘', '女', 20, '123456789012345678', '北京', '2000-01-01',1),
	(2, '00002', 8000, '张无忌', '男', 18, '123456789012345670', '江苏', '2005-09-01',1),
	(3, '00003', 12000, '韦一笑', '男', 68, '123456789712345670', '上海', '2005-08-01',2),
	(4, '00004', 9000, '赵敏', '女', 18, '123456757123845670', '北京', '2009-12-01',2),
	(5, '00005', 8800, '小昭', '女', 16, '123456769012345678', '上海', '2007-07-01',2),
	(6, '00006', 5000, '杨逍', '男', 28, '12345678931234567X', '西安', '2006-01-01',3),
	(7, '00007', 6500, '范瑶', '男', 40, '123456789212345670', '北京', '2005-05-01',3),
	(8, '00008', 10000, '黛绮丝', '女', 38, null, '天津', '2015-05-01',3);
### 部门表
create table dept(
	id int comment 'ID',
	name varchar(10) comment '部门名称'
	)comment '部门表';
INSERT INTO dept  VALUES 
	(1, '研发部'), 
	(2, '市场部'),
	(3, '财务部'), 
	(4, '销售部'), 
	(5, '总经办');

6、数据常用查询

 1
 2
 3
 4
 5
 6
 7
 8
 9
10
11
12
13
14
15
16
17
18
19
20
21
22
23
24
25
26
27
28
29
30
31
32
# (1) 基础查询
select * from emp;                      #全部数据
select name ,gender from emp;           #特定列
select name 姓名, gender 性别 from emp;  #起别名

# (2) 去重查询
select distinct gender from emp;
select distinct gender, workaddress from emp;

# (3) 条件查询
## > < = >= <= !=
## between .. and .. , in, is null, like _匹配单个字符 %匹配任意字符
## and or not
select * from emp where age > 30;
select * from emp where idcard is null;
select * from emp where gender =  "女" and age < 30;
select * from emp where workaddress in ("北京","天津");
select * from emp where name like '小_'; 

# (4) 联合查询
select * from emp where salary < 8000
union
select * from emp where age > 50;

# (5) 排序查询: asc(默认)、desc
select * from emp order by age;
select * from emp order by age, entrydate desc;

# (6) 分页查询/指定范围查询:从a开始,查询b条数据(第一条数据序号为0)
select * from emp limit 0,5;
select * from emp limit 3,3;
select * from emp limit 1 \G

7、统计与分组统计

常用统计函数

count() 行数

avg(), max(), min(), sum()

 1
 2
 3
 4
 5
 6
 7
 8
 9
10
11
12
13
14
15
16
17
18
19
20
21
22
23
24
# (1) 基础统计
select count(*) from emp;
select count(*) count from emp;
select avg(age) from emp;

# (2) 分组统计
select gender, count(*) count from emp group by gender;
select workaddress, avg(age) mean_age from emp group by workaddress;

# (3) 先筛选再统计
select workaddress, avg(age) mean_age
from emp
where gender = "男"
group by workaddress;

# (4) 先统计再筛选
select workaddress, avg(age) mean_age
from emp
group by workaddress
having mean_age > 30;

## 书写顺序:select -- from -- where -- group by -- having
## 执行顺序:from → where → group by → having → select
## select关键字为最后一项执行

8、常用函数与语句

 1
 2
 3
 4
 5
 6
 7
 8
 9
10
11
12
13
14
15
16
17
18
19
20
21
22
23
24
25
26
27
28
29
30
31
32
33
34
35
36
37
38
# (1) 字符串函数
/*
concat()
lower(), upper()
lpad(), rpad()
trim(),
substring()
*/
select lpad(workno, 10, '0') from emp;
select concat(name, ",", gender) from emp;
select substring(idcard, 7, 8) birthday from emp;

# (2) 数值函数
/*
ceiling(), floor()
mod()  余数
rand() 返回0-1随机数
round() 
*/
select round(age/10)*10 from emp;

# (3) 日期函数
/*
curdate  当前日期
curtime  当前时间
now      当前日期+时间
*/
select curdate();
select now();
select year(now());

# (4) 逻辑语句
select name, if (workaddress in ("北京","上海"), "一线", "二线") adress_type
from emp;

select name, 
case when age > 40 then "中年" when age > 30 then "中青年" else "青年" end age_type
from emp;

9、连接两张表

1
2
3
4
5
6
7
8
9
# (1) 内连接
select * from emp, dept where emp.dept_id = dept.id;
select e.name, d.name from emp e inner join dept d on e.dept_id = d.id;

# (2) 左连接
select e.name, d.name from emp e left join dept d on e.dept_id = d.id;

# (3) 右连接
select e.name, d.name from emp e right join dept d on e.dept_id = d.id;

10、嵌套查询

  • 条件语句中的阈值/候选值由嵌套的另一个select语句间接确定
 1
 2
 3
 4
 5
 6
 7
 8
 9
10
11
# (1) 嵌套select返回单个值
select * from emp where dept_id = (select id from dept where name = '研发部'); 
select * from emp where entrydate > (select entrydate from emp where name = '韦一笑');

# (2) 嵌套select返回单列值
## in, not in, any, all
select * from emp where dept_id in (select id from dept where name in ('研发部','市场部'));
## 多重嵌套
select *
from emp
where salary > all (select salary from emp where dept_id = (select id from dept where name = '研发部'));

11、主键与外键

  • 主键(primary key):具有表的唯一标识符的一列数据,一张表只能有一个主键。

    外键(foreign key): 其中的一列数据含义与另一张表的主键相同时,可视为外键。

  • 定义两张表的外键关系时,外键所在表称为子表,另一张表称为父表。

    如上示例数据中,员工表(子表)的dept_id列与部门表(父表)的id列含义相同,可建立外键关系。

 1
 2
 3
 4
 5
 6
 7
 8
 9
10
11
12
13
14
15
16
17
18
19
20
21
22
23
24
25
# 可以在创建表时声明主键与外键,也可以在之后再修改(如下演示)
#(1)设置主键
alter table emp add primary key(id);
alter table dept add primary key(id);

#(2)删除主键
alter table emp drop primary key;

#(3)设置外键
alter table emp 
	add constraint fk_emp_dept_id  #外键名
	foreign key (dept_id)   #外键列
	references dept(id);    #对应哪个表的那个主键

#(4)删除外键
alter table emp drop foreign key fk_emp_dept_id;

#建立外键关系后,默认不允许随意删除delete/修改update父表(dept)的主键数据 -- no action/ restrict
#cascade:父表数据删除,子表对应数据也随之删除
#set null:父表数据删除,子表对应数据改为null
alter table emp 
	add constraint fk_emp_dept_id  
	foreign key (dept_id)   
	references dept(id)
	on update cascade on delete cascade;

三、数据导出与导入

1、数据导出

  • 导出表为txt或者csv文件
 1
 2
 3
 4
 5
 6
 7
 8
 9
10
11
12
13
14
15
16
17
18
19
20
21
# 查看导出的默认路径
show variables like '%secure%';
-- +--------------------------+-----------------------+
-- | Variable_name            | Value                 |
-- +--------------------------+-----------------------+
-- | require_secure_transport | OFF                   |
-- | secure_file_priv         | /var/lib/mysql-files/ |
-- +--------------------------+-----------------------+

# 导出为txt文件
select *
from dept
into outfile '/var/lib/mysql-files/tmp.txt';

# 导出为csv文件
select *
from dept
into outfile '/var/lib/mysql-files/tmp.csv'
FIELDS TERMINATED BY ',' ENCLOSED BY '"'
LINES TERMINATED BY '\r\n';
## 关于导出csv文件用excel打开中文乱码 https://blog.csdn.net/u010735147/article/details/83827857
  • 导处数据库/表为.sql文件(需要退出mysql,在shell界面完成)
1
2
3
4
5
# 导出整个数据库
mysqldump -u root -p firstdb > /path/to/dir/firstdb.sql

# 导出某数据库的某个表
mysqldump -u root -p firstdb emp > /path/to/dir/firstdb.sql

2、数据导入

  • 导入本地表文件至数据库的某个表里,注意导入时列顺序需要相同。

由于无法直接从默认目录读取ERROR 13 (HY000): File '/var/lib/mysql-files/tmp.txt' not found (OS errno 13 - 权限不够)。可以将待读取文件放到mysql所支持的/tmp/临时文件夹

1
cp /var/lib/mysql-files/tmp.txt /tmp/
 1
 2
 3
 4
 5
 6
 7
 8
 9
10
11
12
13
14
15
16
17
18
19
show variables like '%tmpdir%';

SET GLOBAL local_infile=1;
# quit
# mysql --local-infile=1 -u root -p

create table new_table(
	id int comment 'ID',
	name varchar(10) comment '部门名称'
	)comment '部门表';

## 导入txt文件
load data local infile '/tmp/tmp.txt' into table new_table
LINES TERMINATED BY '\r\n';

## 导入csv文件
load data local infile '/tmp/tmp.csv' into table new_table
FIELDS TERMINATED BY ',' ENCLOSED BY '"'
LINES TERMINATED BY '\r\n';
  • 导入本地sql至数据库中
1
2
# 在mysql创建一个新数据库
create database seconddb;
1
2
# 在shell端将sql文件导入至该数据库
mysql -u root -p seconddb < /path/to/dir/firstdb.sql

1、修改sql数据库位置:https://www.tecmint.com/change-default-mysql-mariadb-data-directory-in-linux/

1
2
3
4
5
6
mysql -u root -p -e "SELECT @@datadir;"
-- +-----------------------+
-- | @@datadir             |
-- +-----------------------+
-- | /var/lib/mysql/ |
-- +-----------------------+

四、Chembl数据库实战

关于Chembl数据库:https://www.ebi.ac.uk/chembl/

Chembl数据库SQL下载:https://ftp.ebi.ac.uk/pub/databases/chembl/ChEMBLdb/latest/

文件大小—压缩包1.6G;解压缩后—15G;读入至SQL—33G

  • 首先读入至mysql中
1
2
3
4
5
6
7
8
# 在mysql中创建一个名为chembl_31的数据库
create database chembl_31 DEFAULT CHARACTER SET utf8 DEFAULT COLLATE utf8_general_ci;

# mysql -u root -p  chembl_31 < chembl_31_mysql.dmp
# 大概需要2~3个小时

use chembl_31;
show tables;
  • (1)实验对应的靶点信息
 1
 2
 3
 4
 5
 6
 7
 8
 9
10
11
12
13
14
15
16
17
18
19
20
21
22
23
24
25
26
27
28
29
30
31
32
33
34
35
36
37
38
39
40
41
42
43
44
45
46
select * from  activities limit 1 \G
select * from  target_components limit 1 \G
select * from  component_sequences limit 1 \G

#导入uniprot基因注释
create table uniprot2gene(
	uniprot varchar(30) ,
	gene varchar(50) 
	);
load data local infile '/tmp/chembl_uniprot2gene.csv' into table uniprot2gene
FIELDS TERMINATED BY ','
LINES TERMINATED BY '\r\n'
;
select * from uniprot2gene limit 10;
select * from uniprot2gene limit 1 \G

create table tmp_target_info 
select 
a.assay_id assay_id, a.tid tid, 
b.component_id component_id, 
c.component_type component_type, 
c.accession accession,
c.organism organism,
d.gene gene
from  assays  a
left join target_components b 
	on a.tid = b.tid
left join component_sequences c
	on b.component_id = c.component_id
left join uniprot2gene d
	on c.accession = d.uniprot
where c.organism = "Homo sapiens" and c.component_type = "PROTEIN"
;

select count(*) from tmp_target_info;   
#415795
select * from tmp_target_info limit 5;
-- +----------+--------+--------------+----------------+-----------+--------------+--------+
-- | assay_id | tid    | component_id | component_type | accession | organism     | gene   |
-- +----------+--------+--------------+----------------+-----------+--------------+--------+
-- |   142605 | 104282 |            2 | PROTEIN        | P02708    | Homo sapiens | CHRNA1 |
-- |   142606 | 104282 |            2 | PROTEIN        | P02708    | Homo sapiens | CHRNA1 |
-- |   143098 | 104282 |            2 | PROTEIN        | P02708    | Homo sapiens | CHRNA1 |
-- |   143099 | 104282 |            2 | PROTEIN        | P02708    | Homo sapiens | CHRNA1 |
-- |   143100 | 104282 |            2 | PROTEIN        | P02708    | Homo sapiens | CHRNA1 |
-- +----------+--------+--------------+----------------+-----------+--------------+--------+
  • (2)化合物ID对应靶点的实验结果
 1
 2
 3
 4
 5
 6
 7
 8
 9
10
11
12
13
14
15
16
17
18
19
20
21
22
23
24
25
26
27
28
29
30
31
select * from  activities limit 1 \G;
select * from  molecule_dictionary limit 1 \G

create table tmp_compound_assay 
select 
a.assay_id assay_id, a.molregno molregno, 
b.chembl_id chembl_id,
a.standard_relation standard_relation,
a.standard_value standard_value,
a.standard_units standard_units,
a.standard_flag standard_flag,
a.standard_type standard_type,
a.pchembl_value a.pchembl_value
from activities a
left join molecule_dictionary b
	on a.molregno=b.molregno
where a.assay_id in (select assay_id from tmp_target_info)
;

select count(*) from tmp_compound_assay;   
#5951349
select * from tmp_compound_assay limit 5;
-- +----------+----------+--------------+-------------------+--------------------------------------+----------------+---------------+---------------+
-- | assay_id | molregno | chembl_id    | standard_relation | standard_value                       | standard_units | standard_flag | standard_type |
-- +----------+----------+--------------+-------------------+--------------------------------------+----------------+---------------+---------------+
-- |        4 |   167941 | CHEMBL321330 | >                 | 10000.000000000000000000000000000000 | nM             |             0 | 135           |
-- |       18 |   144846 | CHEMBL313630 | =                 |   300.000000000000000000000000000000 | nM             |             1 | AC50          |
-- |       18 |   144716 | CHEMBL315582 | =                 |   200.000000000000000000000000000000 | nM             |             1 | AC50          |
-- |       18 |   144887 | CHEMBL313613 | =                 |   500.000000000000000000000000000000 | nM             |             1 | AC50          |
-- |       18 |   144715 | CHEMBL316389 | =                 |   200.000000000000000000000000000000 | nM             |             1 | AC50          |
-- +----------+----------+--------------+-------------------+--------------------------------------+----------------+---------------+---------------+
  • (3) 查询PubChemID对应的CHEMBL的化合物实验信息
 1
 2
 3
 4
 5
 6
 7
 8
 9
10
11
12
13
14
15
16
17
18
19
20
21
22
23
24
25
26
27
28
29
30
31
32
33
34
# 查询表query_tb包括两列:第一列,pubchem id;第二列,chembl id
create table query_tb(
	CID int ,
	Chembl varchar(20) 
	);

#读入本地csv文件
load data local infile '/tmp/query_chembl.csv' into table query_tb   
FIELDS TERMINATED BY ','
LINES TERMINATED BY '\r\n';
select * from query_tb limit 10;

#得到筛选结果query_res_tb
create table query_res_tb
select 
cp.chembl_id chembl_id,
cp.standard_relation standard_relation,
cp.standard_value standard_value,
cp.standard_units standard_units,
cp.standard_flag standard_flag,
cp.standard_type standard_type,
cp.pchembl_value pchembl_value,
target.gene gene
from tmp_compound_assay cp
left join tmp_target_info target
	on cp.assay_id=target.assay_id
where cp.chembl_id in (select Chembl from query_tb);

show variables like '%secure%';
select *
from query_res_tb
into outfile '/var/lib/mysql-files/query_chembl_res.txt';

# c("chembl_id","relation","value","units","flag","type","pchembl_value","gene")