1. 简介#
1.1 工具介绍#
- Snakemake 是一个用于创建可重现、模块化、自动化的工作流管理工具,主要用于处理复杂的数据分析流程;在生物信息学领域中有较多的应用。

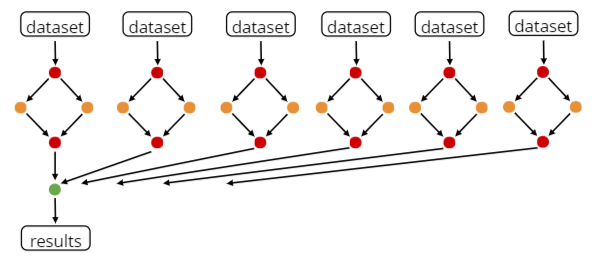
例如对于RNA-seq上游分析流程,通常涉及(1)质控;(2)比对;(3)定量等三大步骤。
- 一方面,每个步骤一般需要使用特定的软件处理,需要特定的输入输出数据。
- snakemake可以对每个步骤进行定制化/模块化。
- 另一方面,通常需要多个样本的数据执行完全相同的分析。
1.2 基本语法#
- 关键步骤是编写一个
Snakefile,定义整个流程Pipeline的分析步骤
- snakemake定义的语法规则是基于python的扩展;
- 每个分析步骤通过
rule语句定义,如下示例:
- 在第1行,通过
rule,声明一个名字"sort"的分析步骤
- 通过
input,指定该步骤的输入数据
- 通过
output,指定该步骤的输出结果
- 通过
shell,定义执行的shell命令
1
2
3
4
5
6
7
|
rule sort:
    input:
        "path/to/dataset.txt"
    output:
        "dataset.sorted.txt"
    shell:
        "sort {input} > {output}"
|
1.3 安装#
- 推荐为一个分析流程,创建特定的conda环境;
- 首先在进入该环境后,安装snakemake工具(需要python>3.5)
1
2
3
4
5
|
# 轻量版:保留核心功能,适用于本地分析。
conda install bioconda::snakemake-minimal

# 完整版:支持执行不同计算环境(如本地集群、云服务等)时所需要的全部功能。
conda install bioconda::snakemake
|
-
再根据流程需要,安装其它的生信分析工具。
-
教程文档提供的示例分析conda环境
 1
 2
 3
 4
 5
 6
 7
 8
 9
10
11
12
13
14
15
16
17
18
19
20
21
22
23
24
25
26
27
|
mkdir snakemake-tutorial
cd snakemake-tutorial

cat environment.yaml  #yaml文件见2.1
# channels:
#   - conda-forge
#   - bioconda
# dependencies:
#   - snakemake-minimal >=8.4.4
#   - jinja2
#   - matplotlib
#   - graphviz
#   - bcftools =1.19
#   - samtools =1.19.2
#   - bwa =0.7.17
#   - pygments
#   - pip:
#     #  at the time of writing - 7. Feb 24 - pysam on bioconda will require
#     #  a lower python version than snakemake, install pysam
#     #  using pip
#     - pysam ==0.22

conda activate snakemake-tutorial
# 上述的pysam安装若由于pip超时而报错,需重新指定镜像源安装
pip install pysam==0.22 -i https://pypi.tuna.tsinghua.edu.cn/simple

snakemake --help
|
教程中推荐使用mamba安装,这里还是替换了为了的conda命令。
2. 示例分析#
2.1 下载示例数据#
 1
 2
 3
 4
 5
 6
 7
 8
 9
10
11
12
13
14
15
16
17
18
|
curl -L https://api.github.com/repos/snakemake/snakemake-tutorial-data/tarball -o snakemake-tutorial-data.tar.gz
# 解压
tar --wildcards -xf snakemake-tutorial-data.tar.gz --strip 1 "*/data" "*/environment.yaml"
# .
# ├── data
# │   ├── genome.fa
# │   ├── genome.fa.amb
# │   ├── genome.fa.ann
# │   ├── genome.fa.bwt
# │   ├── genome.fa.fai
# │   ├── genome.fa.pac
# │   ├── genome.fa.sa
# │   └── samples
# │       ├── A.fastq
# │       ├── B.fastq
# │       └── C.fastq
# ├── environment.yaml
# └── snakemake-tutorial-data.tar.gz
|
2.2 基础分析#
(1)Snakefile#
如下是完整的示例Snakefile文件
 1
 2
 3
 4
 5
 6
 7
 8
 9
10
11
12
13
14
15
16
17
18
19
20
21
22
23
24
25
26
27
28
29
30
31
32
33
34
35
36
37
38
39
40
41
42
43
44
45
46
47
48
49
50
51
52
53
54
55
56
|
SAMPLES = ["A", "B"]


rule all:
    input:
        "plots/quals.svg"


rule bwa_map:
    input:
        "data/genome.fa",
        "data/samples/{sample}.fastq"
    output:
        "mapped_reads/{sample}.bam"
    shell:
        "bwa mem {input} | samtools view -Sb - > {output}"


rule samtools_sort:
    input:
        "mapped_reads/{sample}.bam"
    output:
        "sorted_reads/{sample}.bam"
    shell:
        "samtools sort -T sorted_reads/{wildcards.sample} "
        "-O bam {input} > {output}"


rule samtools_index:
    input:
        "sorted_reads/{sample}.bam"
    output:
        "sorted_reads/{sample}.bam.bai"
    shell:
        "samtools index {input}"


rule bcftools_call:
    input:
        fa="data/genome.fa",
        bam=expand("sorted_reads/{sample}.bam", sample=SAMPLES),
        bai=expand("sorted_reads/{sample}.bam.bai", sample=SAMPLES)
    output:
        "calls/all.vcf"
    shell:
        "bcftools mpileup -f {input.fa} {input.bam} | "
        "bcftools call -mv - > {output}"


rule plot_quals:
    input:
        "calls/all.vcf"
    output:
        "plots/quals.svg"
    script:
        "scripts/plot-quals.py"
|
相关知识点:
-
在第一个 rule all语句声明该流程的最终target输出是什么,然后snakemake会逐步回溯上一步的分析步骤,从而了解全部的分析流程。
- 第一行的
SAMPLES = ["A", "B"]命令通常用于设置批量运行的样本。
- 如果上面的例子是生成bam文件结束(没有
plot_qual)
1
2
3
4
5
|
SAMPLES = ["A", "B"]

rule all:
    input:
        expand("sorted_reads/{sample}.bam", sample=SAMPLES)
|
-
snakemake语法中支持灵活的通配符方式,结合{}调用。可在实践中多加练习尝试
- 上面的示例已展示了多个通配符,还有一种没提到的是:
1
2
3
4
5
6
7
8
|
rule sort_and_annotate:
    input:
        "path/to/{dataset}.txt",
        "path/to/annotation.txt"
    output:
        "{dataset}.sorted.txt"
    shell:
        "paste <(sort {input[0]}) {input[1]} > {output}"
|
-
在rule语句中,除了使用常规的shell命令,也可以设置bash/python/R等脚本script程序。
- 在上面示例流程的最后一步则使用了python脚本:
 1
 2
 3
 4
 5
 6
 7
 8
 9
10
|
# ./scripts/plot-quals.py
import matplotlib
matplotlib.use("Agg")
import matplotlib.pyplot as plt
from pysam import VariantFile

quals = [record.qual for record in VariantFile(snakemake.input[0])]
plt.hist(quals)

plt.savefig(snakemake.output[0])
|
如下为R语言的示例脚本(与上述流程不相关)
1
2
3
|
data <- read.table(snakemake@input[[1]])
data <- data[order(data$id),]
write.table(data, file = snakemake@output[[1]])
|
- 其它细节包括:
- 对于output的保存路径,如果当前目录不存在,则会自动创建。建议每个rule步骤都有独立的output路径
- 当shell命令过长时,可以分行编写;但需要再尾部添加空格。(例如第25、46行)
(2)snakemake#
 1
 2
 3
 4
 5
 6
 7
 8
 9
10
11
12
|
# (1) snakemake会自动寻找当前路径的Snakefile, snakefile, workflow/Snakefile, workflow/snakefile文件;
# 此外也可以重命名为其它,再使用 -s 参数指定即可:

# (2) -n 只打印出即将执行的命令和任务顺序,而不实际执行
# -p 在任务执行前打印 Shell 命令
snake -n -p

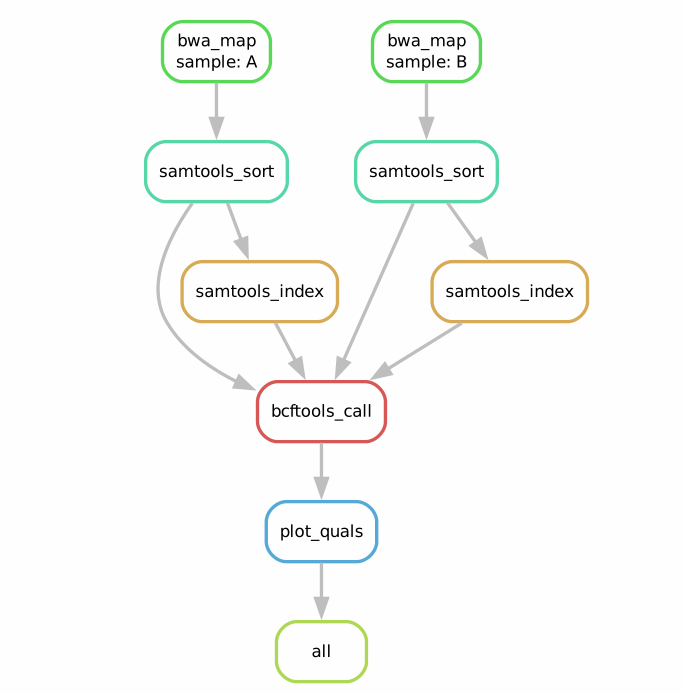
# (3) --dag 可视化工作流中的依赖关系 (DAG,Directed Acyclic Graph),如下示意图
snakemake --dag | dot -Tpdf > test_dag.pdf

# (4) 直接执行
snakemake -p
|

2.3 进阶分析#
(1)Snakefile#
如下是完整的示例Snakefile文件
 1
 2
 3
 4
 5
 6
 7
 8
 9
10
11
12
13
14
15
16
17
18
19
20
21
22
23
24
25
26
27
28
29
30
31
32
33
34
35
36
37
38
39
40
41
42
43
44
45
46
47
48
49
50
51
52
53
54
55
56
57
58
59
60
61
62
63
64
65
66
67
68
69
70
|
configfile: "config.yaml"


rule all:
    input:
        "plots/quals.svg"


def get_bwa_map_input_fastqs(wildcards):
    return config["samples"][wildcards.sample]


rule bwa_map:
    input:
        "data/genome.fa",
        get_bwa_map_input_fastqs
    output:
        temp("mapped_reads/{sample}.bam")
    params:
        rg=r"@RG\tID:{sample}\tSM:{sample}"
    log:
        "logs/bwa_mem/{sample}.log"
    threads: 8
    shell:
        "(bwa mem -R '{params.rg}' -t {threads} {input} | "
        "samtools view -Sb - > {output}) 2> {log}"


rule samtools_sort:
    input:
        "mapped_reads/{sample}.bam"
    output:
        protected("sorted_reads/{sample}.bam")
    shell:
        "samtools sort -T sorted_reads/{wildcards.sample} "
        "-O bam {input} > {output}"


rule samtools_index:
    input:
        "sorted_reads/{sample}.bam"
    output:
        "sorted_reads/{sample}.bam.bai"
    shell:
        "samtools index {input}"


rule bcftools_call:
    input:
        fa="data/genome.fa",
        bam=expand("sorted_reads/{sample}.bam", sample=config["samples"]),
        bai=expand("sorted_reads/{sample}.bam.bai", sample=config["samples"])
    output:
        "calls/all.vcf"
    params:
        rate=config["prior_mutation_rate"]
    log:
        "logs/bcftools_call/all.log"
    shell:
        "(bcftools mpileup -f {input.fa} {input.bam} | "
        "bcftools call -mv -P {params.rate} - > {output}) 2> {log}"


rule plot_quals:
    input:
        "calls/all.vcf"
    output:
        "plots/quals.svg"
    script:
        "scripts/plot-quals.py"
|
此时为更通用的snakemake流程,相关知识点如下:
config.yaml: 将工作流所需的所有参数(例如样本路径、参考基因组位置、工具设置)集中在一个配置文件中,而无需直接修改snakefile
1
2
3
4
5
|
samples:
    A: data/samples/A.fastq
    B: data/samples/B.fastq

prior_mutation_rate: 0.001
|
(2)snakemake#
- 而在执行snake命令时,也有更多的参数方便个性化分析
 1
 2
 3
 4
 5
 6
 7
 8
 9
10
11
12
|
# (1) -j 同时执行的任务数
snakemake -p -j 2

# (2) --core 允许调用的线程上限
snakemake --cores 10

# (3) --rerun-incomplete 断点继续运行未完成的任务
snakemake --rerun-incomplete

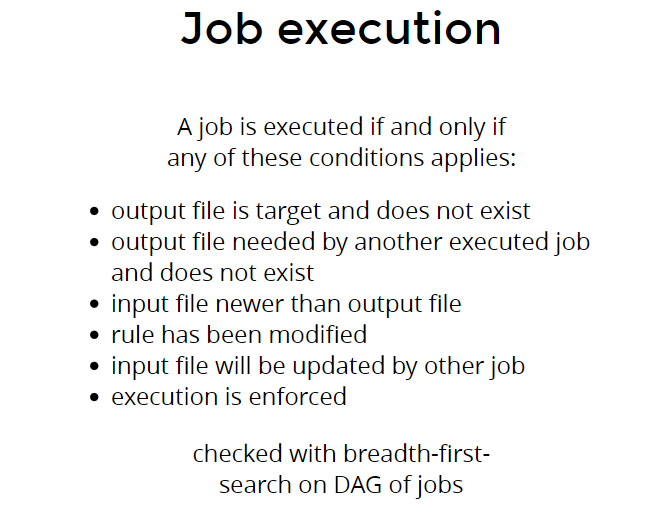
# (4) --force 强制重新运行指定的目标,即使目标文件已经存在。
snakemake --force results/output.txt
# 关于这一点,请参看下图:
|


