rhinoverse系列

  1. rhinoverse系列-rhino包
  2. rhinoverse系列-shiny.router包

image-20240406215907465

1
2
3
4
5
6
7
install.packages("rhino")
packageVersion("rhino")
# [1] ‘1.7.0’

## 启动项目
rhino::init("example_app")
setwd("./example_app")

在初始化项目中,相对重要基础的文件如下:

  • app/logic文件夹:自定义分析函数
  • app/view 文件夹:自定义shiny模块
  • app/main.R文件:shiny主体设计;
  • app.R文件:shiny的执行文件(不用修改);
  • dependencies.R文件:记录所需的依赖包,以更新lock.file;
  • .Rprofile文件:设置options
image-20240406093431293

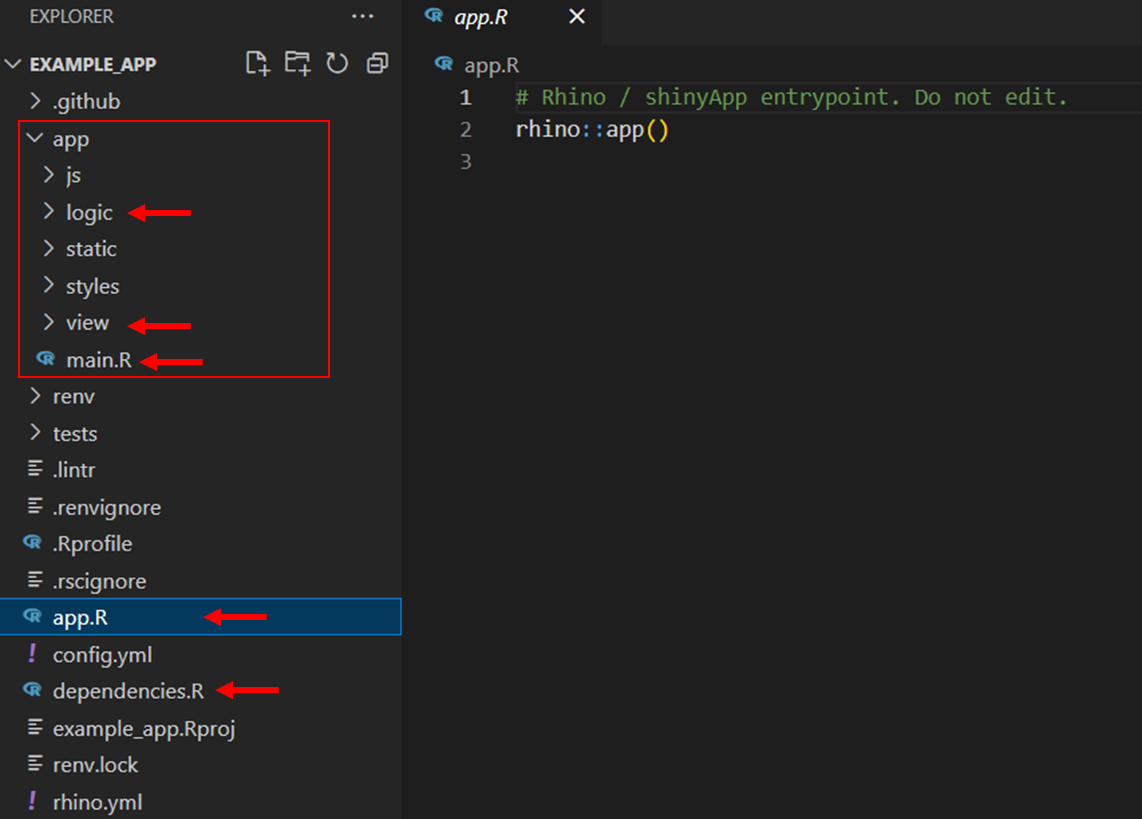
app/static可以放置图片文件(img(src = "static/images/appsilon-logo.png")), CSS、JS等修饰文件(对于JS,需要使用rhino::build_sass()函数处理)

app/style可以放置sass/scss等css预处理文件,需要使用build_sass()函数处理

1. 安装包

  • pkg_install安装相关依赖包;
  • 基于renv::install()函数在当前env环境内安装R包,并自动更新dependencies.R以及相应的lock.file;
1
rhino::pkg_install(c("ggplot2","dplyr"))

2. 定义函数

  • app/logic文件夹内定义R函数;
  • 一个文件内可以包含相关的多个函数,如下为app/logic/func_iris.R
  • 首先需要通过box::use函数引入所需要的工具包或特定函数,相关用法可以参见https://klmr.me/box/介绍。(可以类比Python中import pkg or from pkg import aa, bb更好地理解)
  • 然后在定义每个函数时,需要先加#
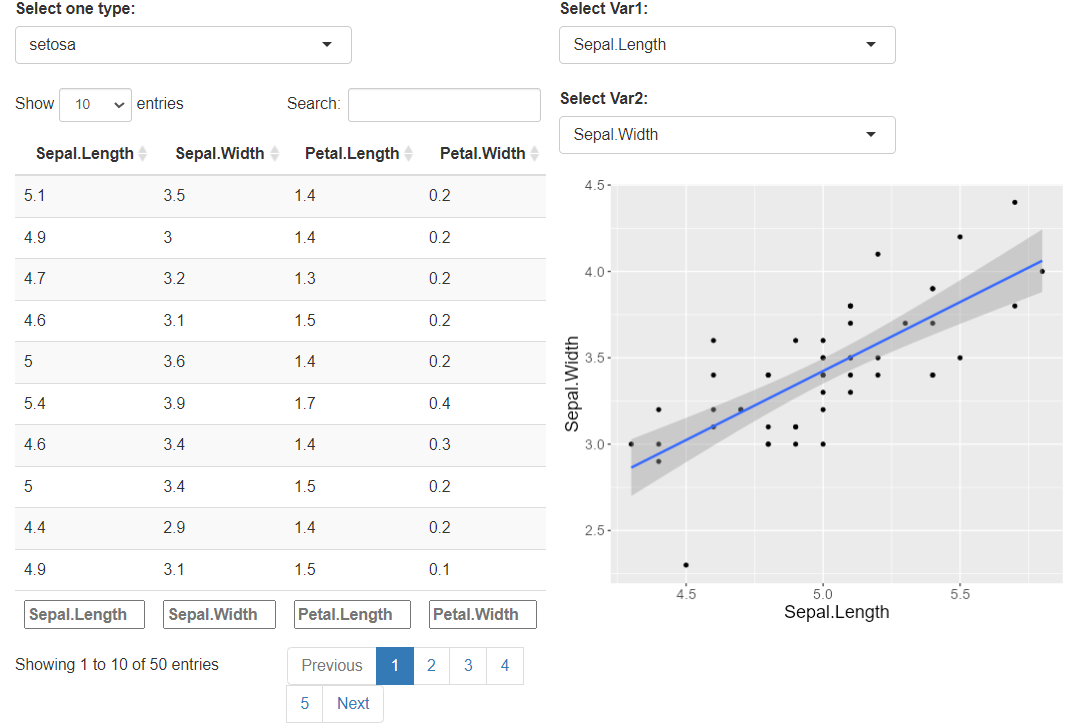
' @export,再编写函数内容。其中使用导入的工具包里的某个函数或数据时需要使用$,例如下面的datasets$iris
  • 如下,共编写了两个iris相关的函数,iris_data返回表格;iris_plot返回图形。
 1
 2
 3
 4
 5
 6
 7
 8
 9
10
11
12
13
14
15
16
17
18
19
20
21
22
23
24
25
26
27
# load packages or functions
box::use(
    datasets,
    dplyr[filter, select],
    ggplot2[ggplot, aes_string, geom_point, geom_smooth, theme, element_text],
    stats[lm]
)

#' @export
iris_data = function(type = c("setosa","versicolor","virginica")){
    type = match.arg(type)
    data = datasets$iris |>
        filter(Species==type) |>
        select(!Species)
    return(data)
}

#' @export
iris_plot = function(var.1, var.2, data){
    stopifnot(var.1 %in% colnames(data))
    stopifnot(var.2 %in% colnames(data))
    data |>
        ggplot(aes_string(var.1, var.2)) +
        geom_point() + 
        geom_smooth(method = lm) + 
        theme(text = element_text(size = 16))
}
  • 测试函数
1
2
3
4
5
6
7
8
box::use(app/logic/func_iris) 
names(func_iris)
# [1] "iris_plot" "iris_data"

func_iris$iris_data("setosa")

## 修改函数后重新加载、测试
box::reload(func_iris) 

3. 定义模块

  • app/view文件夹内定义shiny模块,一个文件内包含一个模块(ui+server)。
  • 首先需要使用box::use()加载所需工具包及特定函数,或自定义的函数。
  • 然后按定义shiny模块的ui与server函数,同样需要添加#' @export语句。
  • 如下,分别定义了两个模块,用于呈现表格与图形

app/view/mod_table.R

 1
 2
 3
 4
 5
 6
 7
 8
 9
10
11
12
13
14
15
16
17
18
19
20
21
22
23
24
25
26
27
28
29
30
31
32
33
# load packages or functions
box::use(
    shiny[fluidPage, NS, moduleServer, tagList, reactive],
    shiny[dataTableOutput, renderDataTable, selectInput],
)

# load self-defined functions
box::use(
    app/logic/func_iris
)

#' @export
ui = function(id){
    ns = NS(id)
    tagList(
        selectInput(ns("type"),"Select one type:",
            choices = c("setosa","versicolor","virginica"),
            selected = "setosa"
        ),
        dataTableOutput(ns("table"))
    )
}

#' @export
server = function(id){
    moduleServer(id, function(input, output, session){
        data = reactive(func_iris$iris_data(input$type))
        output$table = renderDataTable({
            data()
        }, options = list(pageLength = 10))
        data
    })
}

app/view/mod_plot.R

 1
 2
 3
 4
 5
 6
 7
 8
 9
10
11
12
13
14
15
16
17
18
19
20
21
22
23
24
25
26
27
28
29
30
31
32
33
34
35
36
# load packages or functions
box::use(
    shiny[fluidPage, NS, moduleServer, tagList],
    shiny[dataTableOutput, renderDataTable, selectInput],
    shiny[renderPlot, plotOutput],
)

# load self-defined functions
box::use(
    app/logic/func_iris
)

#' @export
ui = function(id){
    ns = NS(id)
    tagList(
        selectInput(ns("Var1"),"Select Var1:",
            choices = colnames(datasets::iris),
            selected = "Sepal.Length"
        ),
        selectInput(ns("Var2"),"Select Var2:",
            choices = colnames(datasets::iris),
            selected = "Sepal.Width"
        ),
        plotOutput(ns("plot"))
    )
}

#' @export
server = function(id, data){
    moduleServer(id, function(input, output, session){
        output$plot = renderPlot({
            func_iris$iris_plot(input$Var1, input$Var2, data()) # where from data
        })
    })
}

4. 编写main.R

  • 接下来,根据已有的模块、函数等,设计总体的shiny页面的布局;
  • 如下,为简单的app/main.R文件。与编写模块类似,首先加载需要的工具包与函数,然后编写ui与server内容。
 1
 2
 3
 4
 5
 6
 7
 8
 9
10
11
12
13
14
15
16
17
18
19
20
21
22
23
24
25
26
27
28
29
# packages or functions
box::use(
    shiny[fluidPage, NS, moduleServer, column],
    shiny[dataTableOutput, renderDataTable],
)

# load self-defined modules
box::use(
    app/view/mod_table,
    app/view/mod_plot
)

#' @export
ui <- function(id) {
  ns <- NS(id)
  fluidPage(
    column(6, mod_table$ui(ns("table"))),
    column(6, mod_plot$ui(ns("plot")))
    
  )
}

#' @export
server <- function(id) {
  moduleServer(id, function(input, output, session) {
    data = mod_table$server("table") # reactive value
    mod_plot$server("plot", data)
  })
}

5. 测试网页

  • 调用 app.R文件,生成并测试网页;
  • 然后,根据需要重复步骤1~4,修改或丰富app内容。
1
shiny::runApp()

image-20240406105735851