shiny中server部分的render×××系列函数是生成reactive output的主要方式。只要其内部的任一input$×××输入参数发生变化都会重新将该函数内部代码全部重新计算一遍以更新输出。此外,类似reactive()observeEvent()等可以帮助实现更加复杂的输入输出控制,下面简单学习记录下。
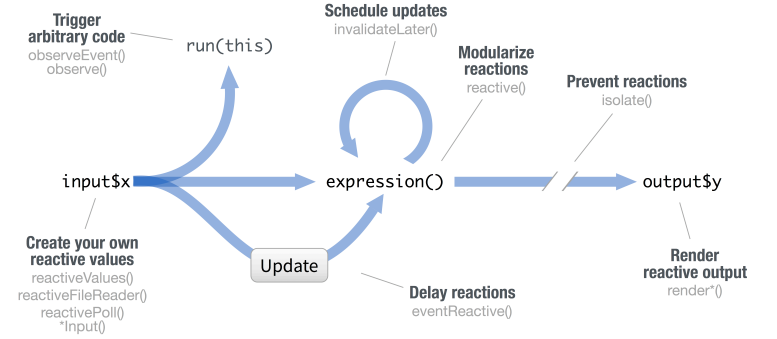
image-20230813164501560

1. reactive()

reactive()函数用于server部分存储中间计算变量。它可以减少不必要的重复计算过程,并提高了代码简洁性。

  • 在使用reactive()计算一个特定中间变量(geneids)时,只要其内部的input$×××变化(input$genes_input),该中间变量的值就会更新。
  • 后续使用这个中间变量时,若需要更新其它的input$×××(input$other1),则并不会重新计算一遍该中间变量的值,而直接使用当前的缓存结果。

除了上面基础用法,还有两个小知识点

(1)reactive()可以嵌套在另一个reactive()里,即理解为计算中间变量的中间变量,实现更加复杂的逻辑。

(2)eventReactive()只有在其第一个参数的事件(通常是actionButton)状态变化才会计算{}内的代码,从而赋予该中间变量一个新的值。

 1
 2
 3
 4
 5
 6
 7
 8
 9
10
11
12
13
14
15
16
17
18
19
20
21
22
23
24
25
26
27
28
29
30
31
32
33
34
35
36
37
38
39
40
41
42
43
44
45
46
library(shiny)

ui <- fluidPage(
  sidebarLayout(
    sidebarPanel(
      textInput(
        "genes_input","Input some genes(with comma as separator)"
      ),
      actionButton("button", "calculate!")
    ),
    mainPanel(
    )
  )
)

server <- function(input, output) {
  geneids <- reactive({
    genenames = input$genes_input
    genenames = trimws(strsplit(aa,",")[[1]])
    return(genenames)
  })
  ## (1)geneids()变量可以用于后续server的多种运算目的
  output$output_1 <- renderPrint({
    function1(geneids(), input$other1)
  })
  output$output_2 <- renderPrint({
    function2(geneids(), input$other2)
  })
  ## (2)多层嵌套
  geneinfo = reactive({
    function3(geneids(), input$other3)
  })
  output$output_3 <- renderPrint({
    function3(geneinfo())
  })
  ## (3)Button to trigger internal calculate
  geneids2 = eventReactive(input$button, {
    genenames = input$genes_input
    genenames = trimws(strsplit(aa,",")[[1]])
  })
  output$output_4 <- renderPrint({
    function4(geneids2())
  })
}

# shinyApp(ui, server)

2. observe()

observe()函数相比于reactive(),前者重点在观测与执行;后者在于计算与变量传递。简单来说,只要observe内的input$×××相关输入发生变化,就会执行内部的所有命令。命令执行的结果可以是产生一个新的output$×××;也可以是修改/更新UI里的控件参数。

reactive()命令的执行结果是产生一个中间变量

  • 对于产生一个新的output$×××,如下示例(1)与(2)的效果理论上是一样的,(3)observe在观测到IF语句的条件为TRUE的情况下执行后面的代码
  • 实际应用中observeEvent()函数出现的频率更多,其会在event触发事件(通常是actionButton)发生的条件下,执行后面{}里命令。
 1
 2
 3
 4
 5
 6
 7
 8
 9
10
11
12
13
14
15
16
17
18
19
20
21
22
23
24
25
26
27
28
29
30
31
32
33
34
35
36
37
38
39
40
41
ui <- fluidPage(
  sidebarLayout(
    sidebarPanel(
      selectInput(
        "gene_id", "Input a gene name",
        choices = c("GeneA","GeneB", "GeneC"),
        selected = "GeneA"
      ),
      actionButton("button", "calculate!")
    ),
    mainPanel(
    )
  )
)

server <- function(input, output) {
  ## (1)
  output$output_1 = renderText({
    function1(input$gene_id)
  })
  ## (2)
  observe(
    output$output_2 = renderText({
      function2(input$gene_id)
    })
  )
  ## (3)
  observe(
    if(input$gene_id %in% geneset){
      output$output_3 = renderText({
        function3(input$gene_id)
      })
    }
  )
  ## (4)
  observeEvent(input$button, {
    output$output_4 = renderText({
      function4(input$gene_id)
    })
  })
}
  • 对于修改/更新UI里的控件参数,需要用到session参数,一般使用update系列函数,比如updateSelectInput(), updateTabsetPanel()
  • 此时update系列函数的第一个参数是session,第二个参数是UI部分里对应元素的ID,后面的参数即可根据需要进行修改、更新。
 1
 2
 3
 4
 5
 6
 7
 8
 9
10
11
12
13
14
15
16
17
18
19
20
21
22
23
24
25
26
27
28
29
30
31
32
33
ui <- fluidPage(
  sidebarLayout(
    sidebarPanel(
      actionButton("butt", "change choices randomly"),
      radioButtons("candi_type", "select gene or pathway!",
                    choices = c("gene","pathway"), selected = "gene"),
      selectInput(
        "mol_id", "select a item",
        choices = NULL
      ),
    ),
    mainPanel(
    )
  )
)

server <- function(input, output, session) {
  ## 根据UI中radioButtons的选择更新selectInput的选项值
  observe({
    if(input$candi_type=="gene"){
      candis = c("GeneA","GeneB","GeneC")
    } else {
      candis = c("PWA", "PWB", "PWC")
    }
    updateSelectInput(session, "mol_id", "select a item", choices = candis)
  })
  ## 通过点击actionButton,随机生成selectInput的选项值
  observeEvent(input$butt, {
    candis_random = paste0("Mol",sample(LETTERS,3))
    updateSelectInput(session, "mol_id", "select a item", choices = candis_random)
  })
}
# shinyApp(ui, server)

NOTE : shiny包还有一个isolate()函数主要是为了stop reactive,即包装在其内部的运算代码不会因input$×××相关输入发生变化而导致全部运行。

3. renderUI()

renderUI()函数(对应ui端的uiOutput())可以根据input$×××输入的变化,生成可调整HTML元素。相比较于常规的render函数,

它有两个特别应用场景。

  • (1)输入控件系列的input, 包括同类input的不同参数或者不同类的input。举例如下
 1
 2
 3
 4
 5
 6
 7
 8
 9
10
11
12
13
14
15
16
17
ui <- fluidPage(
  selectInput("input_id", "Select Control Type:",
              choices = c("Text Box", "Numeric Input")),
  uiOutput("dynamic_control")
)

server <- function(input, output, session) {
  output$dynamic_control <- renderUI({
    choice <- input$input_id
    ##选择文本输入/数值输入
    if (choice == "Text Box") {
      textInput("text_input_id", "Enter Text:", value = "")
    } else if (choice == "Numeric Input") {
      numericInput("numeric_input_id", "Enter Number:", value = 0)
    }
  })
}
  • (2)图表文本等output,可以针对×××output系列函数的自身参数实现对输出的细节调整等。如下是一个例子
 1
 2
 3
 4
 5
 6
 7
 8
 9
10
11
12
13
14
15
16
ui <- fluidPage(
  selectInput("param1", ...),
  selectInput("param2", ...),
  numericInput("plot_size", ...),
  uiOutput("dynamic_control")
)

server <- function(input, output){
  output$res_plot <- renderPlot({ 
    plotfunction(input$param1, input$param2) 
  }) 
  output$dynamic_control <- renderUI({ 
    # 通过numericInput动态调整输出图片的高度
    plotOutput("res_plot", height = input$plot_size) 
  }) 
}